Project Zomboid is a popular survival game that places players in a post-apocalyptic world filled with zombies. For those managing servers or multiplayer sessions, having administrative control can be crucial for maintaining order and enhancing the gameplay experience. This guide covers everything you need to know about adding and managing admins in Project Zomboid, including accessing the admin panel, enabling admin mode, and using admin commands.
Adding and Managing Admins in Project Zomboid
Administrative controls allow server owners and trusted players to manage various aspects of the game, ensuring a smooth and enjoyable experience for all participants. Here’s how to add and manage admins in Project Zomboid.
Project Zomboid: How to Set Admin
- Log into Your Server: Connect to your Project Zomboid server using your preferred method (direct connection, Steam, etc.).
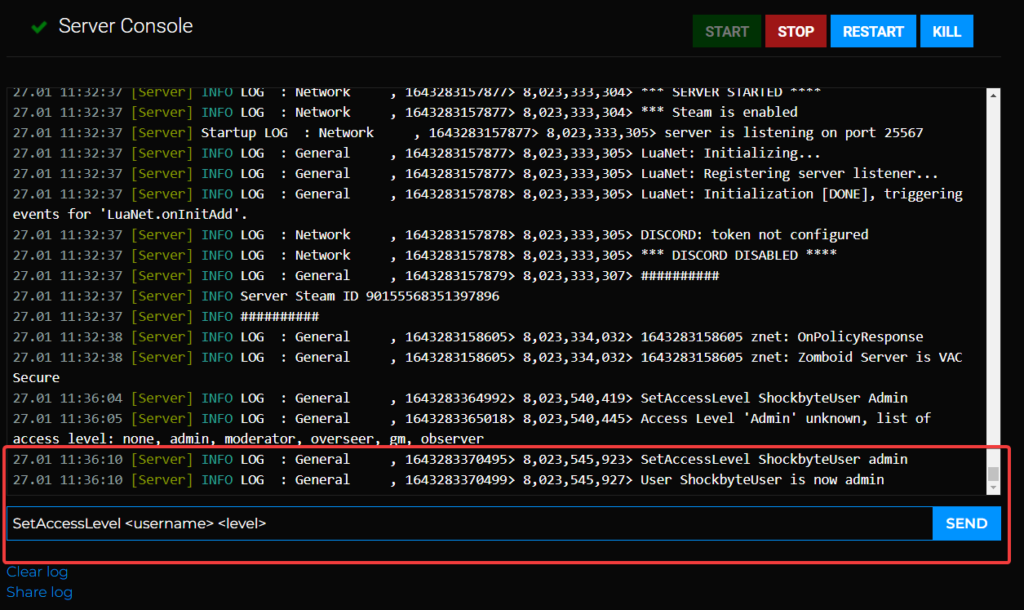
- Access Server Console: Open the server console. This can usually be done via your server hosting provider’s control panel or directly on your server machine.
- Use Admin Command: Enter the following command to set a player as admin:shellКопіювати код
/setaccesslevel [username] adminReplace[username]with the player’s in-game name. This command grants the specified player admin privileges.

Project Zomboid: How to Make Someone Admin
- In-Game Method:
- Join the game with an existing admin account.
- Press
Tto open the chat. - Enter the command
/setaccesslevel [username] adminto make another player an admin.
- Server Console Method:
- Open the server console.
- Enter the command
/setaccesslevel [username] adminto assign admin privileges.
Enabling and Accessing Admin Mode
Admin mode allows players to access special administrative functions and tools to manage the game more effectively.
Project Zomboid: Enable Admin Mode
- In-Game: If you are already an admin, you can enable admin mode by pressing
Tto open the chat and typing/godmod. - Admin Command: Use the command
/setaccesslevel [username] adminif you are enabling admin mode for another player.

Using the Admin Menu
The admin menu provides quick access to various administrative tools and settings.
Project Zomboid: Admin Menu
- Accessing the Admin Menu:
- Press
Escto open the game menu. - Select
Admin PanelorAdmin Menufrom the options.
- Press
- Admin Tools:
- Spawn Items: Quickly spawn items for yourself or other players.
- Teleport: Move players to different locations on the map.
- Manage Players: Kick or ban disruptive players and manage player settings.
Project Zomboid: How to Open the Admin Panel
- In-Game Access:
- Join the game with an admin account.
- Press
Escand selectAdmin Panelfrom the menu.
- Keyboard Shortcut:
- Press
F2to quickly open the admin panel (default shortcut, may vary based on custom settings).
- Press
Project Zomboid: Admin Panel
The admin panel is a powerful tool that allows admins to control various aspects of the game server.
- Server Settings: Modify server settings such as difficulty, loot respawn rates, and zombie behavior.
- Player Management: Manage player permissions, kick or ban players, and monitor player activity.
- World Controls: Adjust world settings, spawn items, and control environmental factors.

Project Zomboid: Admin Commands
Admin commands are essential for managing the game server effectively.
- Give Admin Command:
- Use
/setaccesslevel [username] adminto grant admin privileges. - Use
/removeaccesslevel [username] adminto revoke admin privileges.
- Use
- Common Admin Commands:
/kick [username]: Kick a player from the server./ban [username] [reason]: Ban a player from the server with a specified reason./godmod: Enable or disable god mode for the admin.
Conclusion
Having administrative control in Project Zomboid can greatly enhance your ability to manage the game and ensure a positive experience for all players. Whether you need to add an admin, access the admin panel, or use admin commands, this guide provides all the essential information to get started. Use these tools to maintain order, customize gameplay, and manage your server effectively.

